Ask any paint shop engineer or bodywork tech—car paint dripping is one of the most common and frustrating defects in automotive finishing. It shows up when you least expect it, often after everything else seems to go smoothly. One minute your panel looks perfect, the next it’s marred by runs, teardrops, orcurtains of sagging paint on the car.
What Exactly Is Paint Dripping/Sagging?
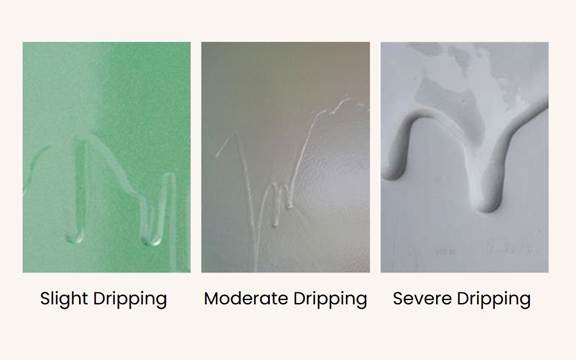
Paint sagging (or running, dripping) occurs when excess wet paint flows downward before it cures, resulting in uneven thickness, visible streaks, or tear-shaped drips. Depending on severity and direction, it may look like:
Source from: https://m.ibuychem.com/expert/article/2502304
- –Fine vertical streaks—barely visible but noticeable under light.
- –Teardrop-like drips—more obvious and concentrated.
- –Large sag waves or curtains—severe distortion of the surface layer.
This guide will help you stop car paint dripping at the source. We’ll walk through:
- -The true root causes (hint: it’s not just the painter’s fault),
- -A step-by-step diagnostic flow,
- -Proven techniques to prevent dripping in the first place,
- -And smart repair strategies when things do go wrong.
Ready to take control of your finish quality? Let’s get started.
Why Does Your Paint Drip?
So, you’ve spotted a sag. Before you reach for the sandpaper, it’s worth asking: Why did it happen in the first place? Blaming the painter is easy, but sagging is usually the result of a combination of factors, from the chemistry of your paint to the air in your booth.
Let’s break it down into four major cause categories you can systematically troubleshoot.
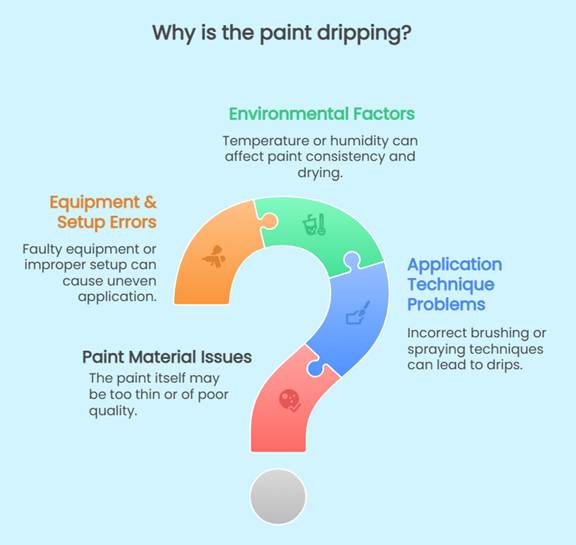
1. Paint Material Issues
Key problems include:
- –Low viscosity / over-thinning: Paint becomes too runny, flows before setting. Using too much thinner or the wrong solvent system lowers viscosity and reduces surface tension, causing the paint to run before film formation completes.
- –Low solids content: Slower film build leads to longer drying windows and weak sag resistance.
- –Slow-evaporating thinner: Gives the paint too much time to move before it tacks.
- –Poor sag resistance in formula: Some products simply aren’t built to hang on vertical panels.
- –Expired or improperly stored paint: Aging changes rheology and stability—bad news for consistency.
- –Incompatible thinner: it may alter the drying balance or react with resins, leading to uneven film formation or delayed curing—ideal conditions for dripping.
Quick check: Review your material data sheet (TDS). Is the viscosity within spec? Was the right thinner used?
2. Application Technique Problems
Even with perfect paint, poor technique can sabotage your finish.
- –Too much film in one pass: Exceeds the paint’s ability to stay in place.
- –Spray too close: Floods the surface with wet paint.
- –Too slow or uneven gun movement: Localized buildup creates runoff points.
- –Wrong spray angle: Spraying at an angle causes pooling at panel edges or curves.
- –Incorrect recoat timing: Applying a second coat before the first flashes properly causes a solvent trap and sag.
Pro tip: Flow typically occurs on panel edges, sharp body lines, and accidental re-spray areas, where paint tends to build up. These locations should be treated with extra care during spraying. Use a wet film gauge. Monitor spray distance and overlap consistency.
3. Environmental Factors
Your booth conditions can quietly ruin an otherwise perfect job.
- –Low temperature: Slows solvent evaporation and delays skin formation.
- –High humidity: Affects flash-off and may lead to surface moisture.
- –Poor airflow: Prevents solvent vapor from escaping, prolonging the wet edge.
Fix it: Log booth temperature, humidity, and air speed regularly. Make adjustments before you spray, not after defects appear.
4. Equipment & Setup Errors
The wrong settings—or worn-out hardware—can set you up for failure.
- –Incorrect gun pressure: Too low = poor atomization; too high = excessive material flow.
- –Damaged or mismatched nozzles: Uneven fan pattern or excessive volume.
- –Vertical panel orientation: Increases gravity’s pull, especially with wet-heavy coats.
Inspect before you spray: Check air cap wear, tip size, and test your fan pattern on a sample panel.
Car Paint Dripping Diagnostic Table
| Cause Type | Typical Sagging Appearance | Common Locations | Additional Clues |
| Over-thinning / Low Viscosity | Wide-area smooth curtain-like drips; heavy, oily appearance | Large vertical surfaces (e.g., doors, trunk panels) | Often associated with poor gloss, slow drying |
| Low Solids / Poor Sag Resistance | Soft, general downward flow texture; lacks film body | Lower parts of vertical surfaces | Common with low-grade or improperly formulated paints |
| Excessive Paint Application | Wavy vertical trails or runs, may include bubbles or wrinkles | Large panels, touch-up zones | Clear gravity-direction flow patterns |
| Spraying Too Close / Too Slowly | Localized heavy runs; teardrop-shaped or “dribble-like” appearance | Edges, recesses, or near start/stop zones | Common around repair areas or start points of a spray stroke |
| Improper Spray Angle | Diagonal or sideways sag lines; off-vertical flow patterns | Corners, edges, pillars | Flow direction deviates from gravity, indicating angled spray |
| Insufficient Flash Time (Wet-on-Wet) | Upper layers sliding over wet base coats, resulting in film movement | Multi-coat areas | Slippage between layers, film separation effect visible |
| Worn Nozzle / Uneven Spray Pattern | Patchy or one-sided heavy sagging, blurred spray edge outlines | Random but irregular zones | One side visibly heavier; uneven film thickness due to spray pattern failure |
| Low Temp / High Humidity | Slow-drying, sticky downward flow; may also show whitening or uneven drying marks | Areas near exterior walls, cold air zones | May co-occur with blushing, micro-bubbling, or delayed curing |
| Dirty / Contaminated Substrate | Localized detachment and sagging, with poor wetting and possible delamination | Oily or unclean areas | Poor surface tension leads to flow-off and uneven adhesion |
| Brush Application Issues | Bead-like, teardrop drips, especially in recessed or angled areas | Manual touch-up zones, trims, corners | Caused by overloaded or too-soft brushes; uneven pressure and excessive loading |
Step-by-Step Diagnosis — Pinpointing the Problem Source
Step 1: Observe & Record
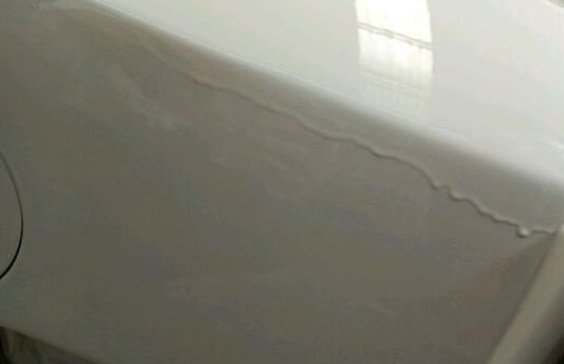
Start by taking a close look—every sag tells a story.
- –Where did it happen? (Vertical panels? Lower edges? Curved surfaces? Pay special attention to corners, beads, recessed lines, and vertical seams—these are common zones for flow defects due to geometry-induced build-up.)
- –What does it look like? (Thin streaks, heavy teardrops, curtain-like?)
- –How bad is it? (Light texture vs. full film slide)
- –Is it recurring? (Same booth? Same operator? Same product?)
Tip: Snap photos for future reference. Patterns often emerge over time.
Step 2: Check the Paint System
- –Viscosity too low? Use a flow cup to measure actual spray viscosity.
- –Thinner selection right? Too slow and you risk sagging. Too fast and you get orange peel.
- –Correct mix ratio? Double-check against the TDS. Over-thinning is a silent killer.
- –Storage history? Old or heat-exposed material may lose consistency.
- –Batch issue? Try a sample from a different lot to rule out formulation variation.
Step 3: Review Spray Parameters
- –Gun pressure okay? Low pressure = poor atomization = high-volume drips.
- –Distance consistent? Too close = heavy wet film.
- –Spray speed steady? Slow passes = uneven buildup.
- –Spray angle correct? Keep it perpendicular for even coating.
- –Film build measured? Check with a wet film gauge—don’t rely on gut feeling.
Step 4: Assess the Booth Environment
- –Temperature stable? Ideal: 20–25°C (68–77°F).
- –Humidity under control? Aim for 40–60% RH.
- –Airflow sufficient? Poor ventilation traps solvents and prolongs wet edge.
Log booth data regularly. Don’t spray blind.
Step 5: Inspect Equipment
- –Spray gun clean? Check for nozzle clogs, wear, or uneven patterns.
- –Compressor pressure steady? Fluctuations affect atomization.
- –Air hose in good shape? Leaks cause pressure drops and spray inconsistency.
Always do a test spray before critical jobs. Maintenance pays off.
Step 6: Check the Substrate
- –Is the surface clean? Any oil, dust, or residue can change film behavior. Even minor residue can cause adhesion imbalance and result in sagging or tearing of the film.
- –Smooth and level? Dents or texture can lead to pooling and uneven coverage.
Step 7: Controlled Test Sprays
Still unsure? Run a controlled comparison:
- -Change one variable at a time (thinner, pressure, distance, etc.)
- -Spray test panels side-by-side
- -Analyze where sagging begins to appear
Real testing > endless theory.
Common Pitfalls to Avoid
- -Only blaming the painter—most sagging is multi-factorial.
- -Ignoring wet film thickness—it matters more than dry specs.
- -Skipping equipment inspection—gun issues are sneaky.
- -Not logging booth data—if it’s not measured, it can’t be controlled.
Effective Solutions — Fixing & Preventing Paint Dripping
Once you’ve diagnosed sagging, the next step is clear: stop it from happening again—and fix it when it does.
How to Fix Paint Sagging When It Happens
• Minor Sagging
- -Let the area fully cure (don’t sand while soft).
- -Use fine sandpaper (P600–P1500) to level the sag gently.
- -Follow with polish or compound to restore gloss.
• Severe Runs
- -Sand down the entire sagged area to a flat surface. For fully cured, severe sags, hand wet-sanding with fine-grit paper (P600–P1500) can be more effective than dry sanding, especially on softer finishes. Follow up with polishing and recoating if necessary.
- -Feather the edges to blend with the surrounding paint.
- –Respray using correct parameters, starting with a tack coat.
Watch this video for more details:

Source from: YouTube@Conorsev https://www.youtube.com/watch?v=CdReozS-Eao
How to Prevent Paint Sagging
1. Pre-process the surface.
For complex surfaces, smooth, sharp edges, and level out transitions before spraying. Paint naturally pools in ridges and valleys—mechanical prep here avoids film overload.
2. Choose the Right Paint & Adjust It Properly
- -Go for high-solid, high-thixotropy coatings that resist flow on vertical surfaces. SANVO offers easily applied, fast-dry acrylic spray paint for car repairing or DIY repainting.
- -Follow the manufacturer’s mixing and dilution instructions precisely—don’t eyeball it.
- -Select a thinner with the correct evaporation rate for your shop temperature and humidity.
SANVO spray paint test: https://youtu.be/8wPnoMpi8yM
3. Spray Smarter, Not Heavier
- -Thin layers, multiple coats: Don’t try to cover in one heavy pass.
- -Keep a consistent gun speed and hold the spray perpendicular to the panel.
- -Maintain proper overlap—usually 50–66% for even coverage.
- -Respect recoat windows: Apply the next layer only after the first is tack-free.
4. Always Do a Test Spray
- -Spray a test panel using the current setup and conditions before touching the actual part.
- -Adjust pressure, distance, or thinner blend if needed.
5. Control Your Environment
- -Keep booth temperature between 20–25°C and humidity below 60%.
- -Ensure air circulation and ventilation are working efficiently.
6. Maintain Your Gear
- -Clean spray guns daily. Worn nozzles = uneven fan = sagging risk.
- -Calibrate your pressure settings and airflow regularly.
One hour of prep saves ten hours of rework.
Read More: How to Fix Spray Paint Mistakes
Conclusion — Achieve Master-Level Paint Finishes
Controlling paint sag isn’t just about fixing mistakes—it’s about mastering the craft. Drips and runs are the result of physical forces, chemical behavior, and human technique interacting on a vertical surface. By understanding their root causes and applying structured prevention methods, any painter—whether in a factory booth or a custom shop—can drastically reduce sagging incidents.
Have a dripping problem that just won’t quit?
Talk to Our Coating Experts Now